If there’s one thing nine years on Instagram have taught me, working with brands of all sizes, it’s that most of the work of keeping your account safe happens before anything ever goes wrong. It’s how your account is set up, what’s connected to it, and the small habits that decide how the AI sees you.
So I’ve put together the steps I’d take today if I wanted my account as safe as it can possibly be.
Some take five minutes, some take a bit longer. But every one of them makes your account harder to lose, and easier to recover if the worst does happen.
Let’s get into it.
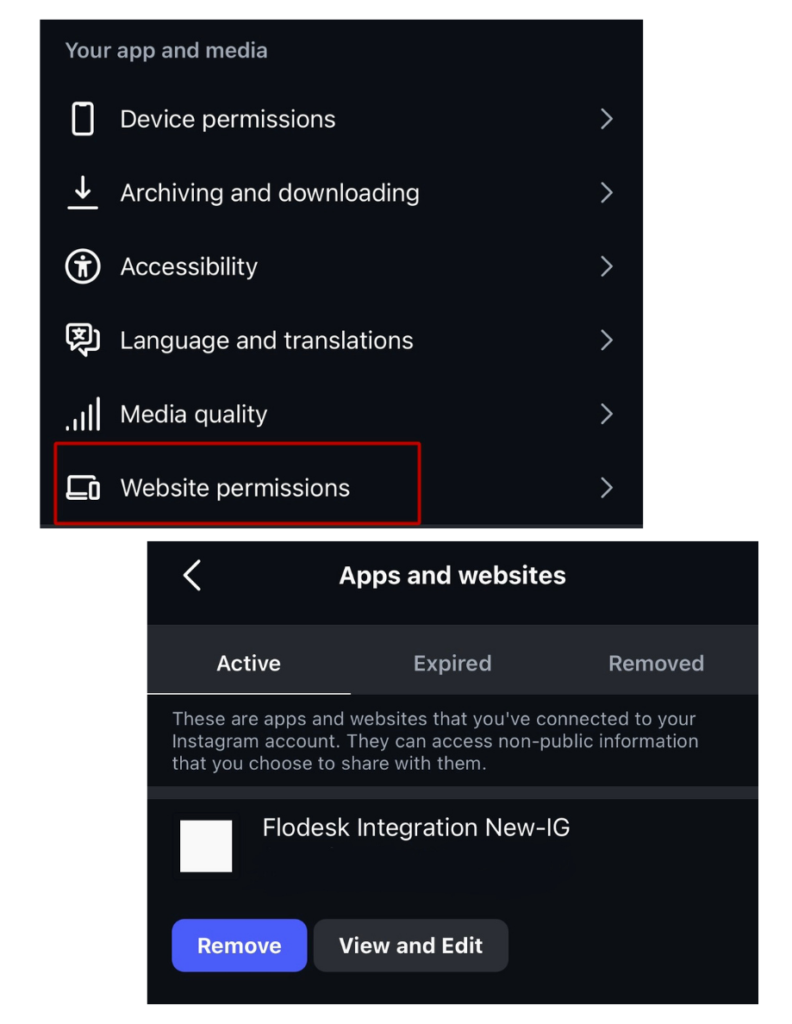
1. Clean up your third-party app permissions
Start here. Most of us have given dozens of apps access to our Instagram over the years. Old schedulers, growth tools, link-in-bio services, photo editors, brand collab platforms. Half of them you’ve probably forgotten about. The trouble is, if any of them are sending suspicious-looking requests in the background, Instagram’s AI can pick that up and decide your account looks bot-like.
How to clean it up: open Instagram and go to Settings > Your app and media > Website permissions. If you don’t actively use the app, remove it. You can always grant access again later if you need to. Do the same on Facebook, because permissions can carry over.
2. Set up a backup account, and then leave it alone
This is your insurance policy.
Create a second Instagram account using a different email address. Set up a basic profile, post one or two things if you want, and then let it sit there. Don’t actively use it. Don’t link it directly to your main account. Just let it exist quietly in the background.
Why bother? Because if your main account ever gets disabled, this is what gives you a route back in. Most of the people who’ve successfully recovered disabled accounts have done it through a separate account that wasn’t affected by the ban.
You don’t need to do anything else with it now. Just have it ready.
3. Switch on two-factor authentication
If you haven’t done this yet, do it today. Right now if you can.
A huge number of accounts that get banned actually get hacked first. The hacker logs in, does something that triggers a policy violation, and then Instagram bans the account. By the time you realise what’s happened, you’ve been disabled for something you didn’t even do.
Two-factor authentication makes this almost impossible.
To turn it on: Settings > Accounts Centre > Password and Security > Two-factor authentication. Use an authentication app rather than text messages where you can, it’s much more secure.
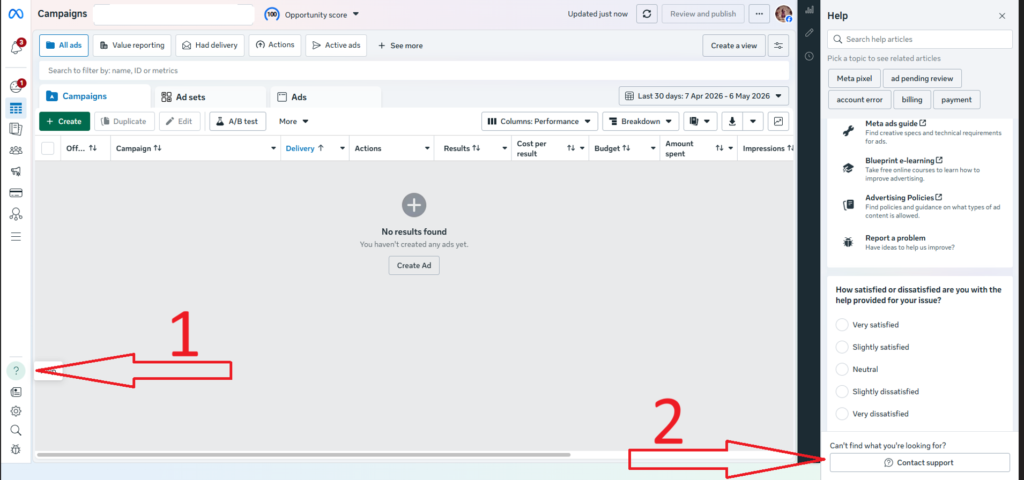
4. Get yourself a Facebook Business page and run one £5 promoted post
This might be the single most useful thing on this list, and it’s the one almost nobody talks about.
Once you have a Facebook Business page connected to your Instagram, you unlock a higher tier of support. And once you’ve spent any amount of money on a promoted post, even just £5 one time, you get access to live chat support with an actual human at Meta.
That live chat is gold. People are getting their disabled accounts restored within hours through that channel, when standard appeals would have left them waiting weeks for a generic denial.
Here’s what to do: go to Facebook and create a Business page if you don’t already have one. It can be your name, your brand, anything that fits. Connect it to your Instagram through Meta Business Suite. Then promote one of your existing Instagram posts for £5, just once. That single £5 puts you on the list Meta prioritises for support.
To find the support chat once it’s active: open Meta Ads Manager (not Business Suite). Tap the question mark icon in the bottom left corner, and a help panel will open on the right. The Contact support button sits at the bottom of that panel.
If something ever happens to your main account, you’ve got a way to reach a real person.
5. Make sure your email and phone number are up to date
Sounds basic, but a lot of accounts still have old contact details on file. If Instagram needs to verify it’s really you, send you a recovery code, or ask for ID confirmation, those are the details they’ll use. If they’re old, you’re in trouble.
Go to Settings > Accounts Centre > Personal Details > Contact Info. Make sure your current email and phone number are there and confirmed.
6. Have at least one photo of yourself on your main account
This one matters most for recovery. If your account ever gets disabled and Instagram asks you to prove it belongs to you, they’ll look at the photos on the account itself. Without a clear picture of you somewhere on there, proving ownership is much harder.
You don’t need to start posting selfies if that’s not your style. Even one clear photo of you somewhere on your grid, plus a real profile picture, makes a real difference.
7. Watch what you post
Instagram’s AI is being far stricter than usual at the moment. Certain words, topics and visuals are quietly being flagged, and most people don’t realise until their reach drops or their account gets restricted.
I’ve put together a separate banned words list with everything I’d be cautious about right now.
In the meantime, the broad areas to think twice about are anything around money, weight, supplements, alcohol, profanity, and too much skin in visuals. None of these are wrong as topics in life, the AI is just very jumpy.
8. What to do if your account does get blocked
Hopefully you’ll never need this part, but just in case, here’s the order I’d work through.
First thing: tap the “Request Review” button straight away. If you see it on the login screen, use it immediately. The longer you wait, the lower your chances.
If the standard appeal doesn’t work, try the “Get help logging in” route. On the login screen, tap Get help logging in, follow the prompts as if your account was hacked, and verify your identity with ID or video selfie. This often routes your case to an actual human reviewer rather than the bot that probably banned you in the first place.
If they ask for government ID verification, send a clean, well-lit photo of a valid government-issued ID. Don’t send a creased, blurry, or partial photo. Speed matters here.
If you have a Facebook Business page with a promoted post in your history, go to Meta Ads Manager and use the support chat (question mark in the bottom left, then Contact support in the panel that opens on the right). This is the channel with the highest success rate.
If your main account is fully locked out and you have your backup account ready, you can subscribe to Meta Verified on the backup and use the priority support chat from there.
One important thing: don’t submit ten appeals in a row. It feels like the right thing to do, but it can actually slow your case down or get it flagged as spam. One appeal, then escalate through the other channels.
That’s it from me. Save this for whenever you might need it.